Getting your printer up and running with your laptop can sometimes feel more like a puzzle than a straightforward task. You’re excited to print that important document, but the setup seems confusing, or the printer just won’t show up on your laptop. Don’t worry—that’s completely normal! Whether you want to connect your printer via USB or set it up wirelessly, I’m going to walk you through everything you need to know. No jargon, no tech speak, just easy steps you can follow.
How Do I Connect a Printer to My Laptop via USB?
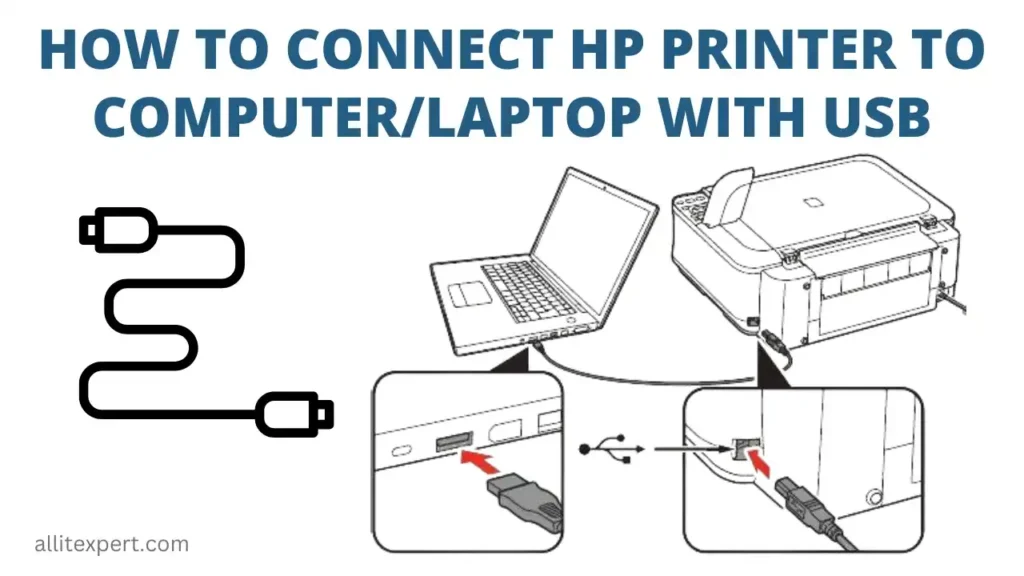
Let’s start with the classic: plugging your printer directly into your laptop with a USB cable. This is usually the simplest, most reliable way to connect.
Step 1: Get the Right USB Cable
Most modern printers come with a USB cable, but if yours didn’t, you’ll need a USB Type-B to USB Type-A cable. The square-ish end plugs into the printer, and the flat one goes into your laptop.
Step 2: Plug It In and Power It Up
Turn on your printer, then plug the USB cable into both your printer and laptop. Your laptop should recognize the printer automatically and may start installing drivers on its own. If you hear that “ding” or see a notification, you’re on the right track.
Step 3: Install Drivers if Needed
Sometimes your laptop can’t find the right drivers automatically (more on this soon). If it doesn’t, head to your printer manufacturer’s website, look up your model, and download the latest drivers. Run the installation file once downloaded.
Step 4: Set the Printer as Default (Optional but Recommended)
On Windows, go to Settings > Devices > Printers & scanners, then click on your printer and choose Set as default. On a Mac, open System Preferences > Printers & Scanners, select your printer, and click Default printer.
Step 5: Test It Out
Try printing a test page or any document. If it prints, congrats! You’re all set.
How Do I Connect a Printer to My Laptop Wirelessly?
Wireless printers are super convenient but setting them up can be tricky if you’ve never done it before. Here’s a beginner-friendly approach.
Step 1: Ensure Your Printer Supports Wi-Fi
First, check if your printer has wireless capability—look for a Wi-Fi symbol or check the specs. If it’s a wireless printer, great! If not, you’ll need to stick with USB or consider a wireless print server.
Step 2: Connect Your Printer to Your Wi-Fi Network
Most wireless printers have a menu on the printer display where you can select your Wi-Fi network and enter the password. Some newer printers even support WPS (Wi-Fi Protected Setup), which lets you press a button on your router and printer to pair them quickly.
If your printer has no screen, check the manual for instructions on how to connect it to Wi-Fi using your computer or mobile app.
Step 3: Add the Printer to Your Laptop
Once your printer is on the network:
-
On Windows: Go to Settings > Devices > Printers & scanners, click Add a printer or scanner, and select your printer from the list.
-
On Mac: Open System Preferences > Printers & Scanners, then click the + button and choose your wireless printer.
If your laptop doesn’t find the printer, you may need to manually enter the IP address (find this from your printer settings or your router’s admin page).
Step 4: Install Drivers or Software
Often, your computer will grab the right driver automatically when you add the printer. If not, back to the manufacturer’s website to download them manually.
Step 5: Test the Connection
Print a test page or open a document and hit print. If it doesn’t work, don’t worry—we’ll cover troubleshooting later.
What Drivers or Software Do I Need to Install?
Here’s where many get stuck: You might think the printer should just “work” once plugged in, but often you need the right drivers or software installed.
What Are Drivers?
Drivers are programs that help your laptop talk to your printer. Without the right driver, your laptop might not recognize your printer correctly or might only offer limited functionality.
Where to Get Drivers?
Your best bet is the printer manufacturer’s website. For example, if you have an HP printer, visit HP’s official support page. Enter your printer model, and download the latest drivers compatible with your laptop’s operating system.
Software Suites
Many printers come with extra software for scanning, maintenance, and more. You don’t have to install all of it if all you want to do is print, but it can be useful.
Automatic Driver Installation
Both Windows and macOS have extensive built-in driver libraries. Sometimes when you connect your printer, your OS will automatically download and install the right drivers behind the scenes.
Keep Drivers Updated
Outdated drivers can cause errors or printing problems. It’s a good idea to check for updates every few months or if you notice your printer acting up.
How Do I Troubleshoot Common Connection Issues?
If your printer isn’t showing up in your laptop’s list of devices, or prints fail, you’re probably feeling frustrated right now. Let’s tackle the most common snags.
Issue 1: Printer Not Recognized by Laptop
-
Check the Cable: If you’re using USB, make sure the cable is fully plugged in and not damaged. Try a different USB port.
-
Restart Devices: Turn off your printer and laptop. Then, power them back on.
-
Run the Troubleshooter (Windows): Go to Settings > Update & Security > Troubleshoot > Printer and run the troubleshooter.
-
Reinstall Drivers: Remove the printer from your devices list and reinstall drivers.
Issue 2: Wireless Printer Not Found
-
Same Network?: Make sure your laptop and printer are on the same Wi-Fi network. It’s a common oversight.
-
IP Address Conflicts: Sometimes printers get a new IP address from your router. You can assign a static IP in your printer settings to avoid losing it.
-
Firewall or Antivirus: Check if security software is blocking the printer connection.
-
Reset Network Settings: On the printer, reset the network settings and try reconnecting.
Issue 3: Printing Jobs Stuck in Queue
-
Open the Print Queue on your laptop, cancel all jobs, and try printing again.
-
Restart the Print Spooler service (on Windows) if you’re comfortable doing so.
Issue 4: Driver Installation Fails
-
Ensure you downloaded the driver matching your exact printer model and laptop OS version.
-
Run the driver installer as Administrator.
-
Temporarily disable antivirus during installation; sometimes security software blocks driver installs.
Bonus: Quick FAQ Table
| Question | Answer |
|---|---|
| Can I use a USB hub for my printer? | Usually yes, but a direct laptop USB port is more reliable. |
| What if my laptop doesn’t have USB-A ports? | Use a USB-C to USB-B adapter or cable if your laptop only has USB-C. |
| Will my printer work on multiple laptops? | Yes, wireless printers can be shared easily on the same network. |
| Why does my printer say offline? | It might be disconnected, out of paper, or have driver issues. Try restarting it. |
Final Thoughts
Connecting a printer to your laptop doesn’t have to be a headache. Start with the simple USB connection if you want the fastest setup. If wireless is your goal (and it probably is, right?), take your time connecting the printer to your Wi-Fi and adding it to your laptop carefully. Don’t skip installing the right drivers—they really are key to smooth printing.
And if things go sideways, remember: unplug, restart, and double-check your network settings. Sometimes tech just needs a little patience. You’ve got this!
References
[1] According to HP Support, downloading the latest printer drivers from the manufacturer’s site ensures better compatibility and fewer errors. (https://support.hp.com)
[2] Microsoft’s guide on troubleshooting printers emphasizes checking network connections and running the built-in troubleshooter as first steps. (https://support.microsoft.com)
[3] Apple Support notes that macOS automatically detects most wireless printers once connected to the same Wi-Fi network. (https://support.apple.com)