Taking a screenshot might seem simple, but if you’re new to HP laptops or Windows 10, it can get a bit confusing. You might wonder: Which keys do I press? Where does this screenshot go? Can I capture just part of the screen instead of everything? Trust me, you’re not alone—lots of people struggle with this initially. But don’t worry, by the end of this guide, you’ll know all the tricks to snap screenshots like a pro.
What Are the Different Methods to Take a Screenshot on an HP Laptop with Windows 10?
Good news: Windows 10 offers several built-in ways to take screenshots, and most work perfectly on HP laptops. Here’s a quick overview before we dig into step-by-step instructions.
- Using Keyboard Shortcuts — Fast and easy, no software needed.
- Snipping Tool / Snip & Sketch — Handy built-in apps for more control.
- Using the Print Screen (PrtScn) Key — Classic but with some useful variations.
- Third-Party Apps — If you want more features, but usually not necessary.
We’ll focus mostly on the first three since they’re built right into Windows and require no downloads.
1. Using Keyboard Shortcuts
This is the quickest way and works well for most people:
| Shortcut | What it Does |
|---|---|
| PrtScn | Copies the entire screen to the clipboard. |
| Windows Key + PrtScn | Saves the entire screen as an image file. |
| Alt + PrtScn | Copies the active window to the clipboard. |
| Windows Key + Shift + S | Opens snipping toolbar to select part/screen. |
2. Snipping Tool and Snip & Sketch
Windows 10 also includes Snipping Tool and a newer app called Snip & Sketch (accessible by pressing Windows Key + Shift + S). These let you capture part or all of your screen and annotate afterward.
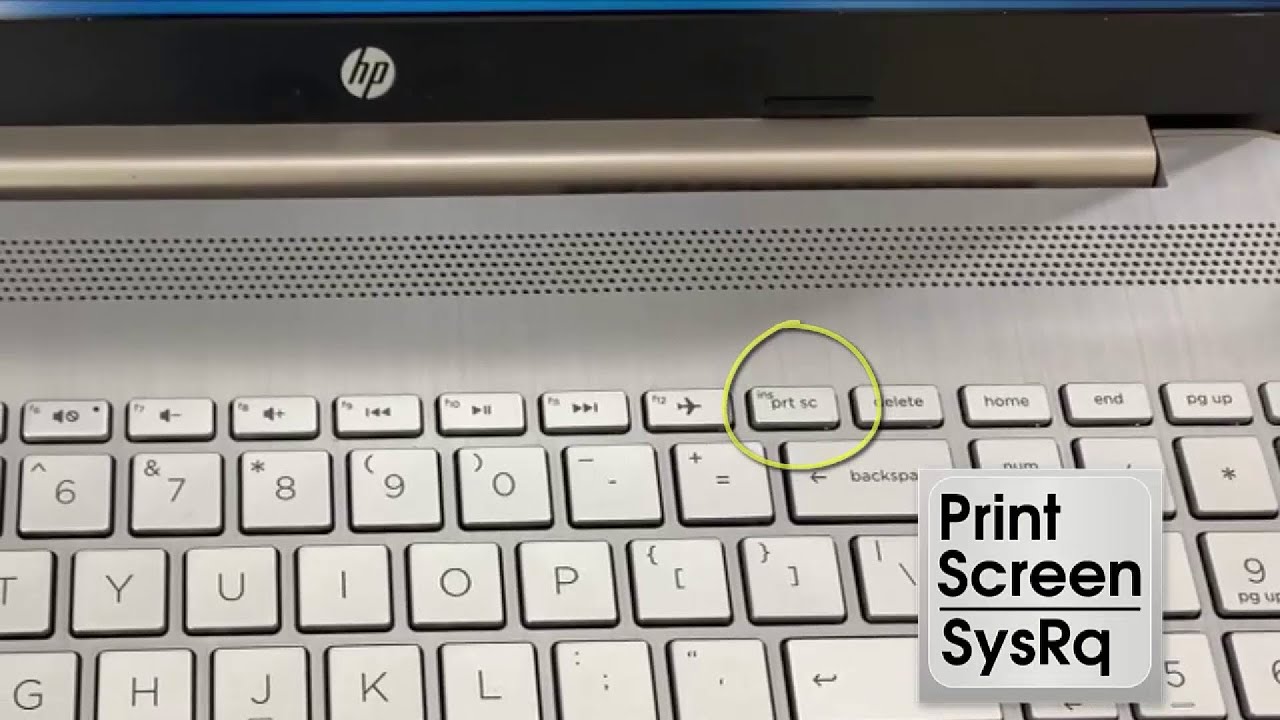
3. Using the Print Screen Key (PrtScn)
The PrtScn key on HP laptops sometimes confuses people because it can have multiple functions depending on whether you press it alone or with other keys. Don’t worry; we’ll clarify this soon.
Step-by-Step: How to Take a Screenshot on an HP Laptop with Windows 10
Now, let’s go through each method with a friendly, step-by-step vibe.
Method 1: Capture the Entire Screen and Save Automatically
-
Press Windows Key + PrtScn together.
Your screen will briefly dim or flash to confirm the capture. -
The screenshot is automatically saved in your Pictures > Screenshots folder.
To find it, open File Explorer (the folder icon on your taskbar), click Pictures, then open Screenshots. Your latest screenshot should be right there!
This is perfect if you want to grab what’s on your screen quickly and save it without any extra steps.
Method 2: Copy the Entire Screen to Clipboard (Paste Anywhere)
-
Press the PrtScn key alone (sometimes labeled PrtSc, PrntScrn, or similar).
-
Nothing will appear to happen, but your screenshot is copied to the clipboard.
-
Open an image editor or document (like Paint, Word, or an email client).
-
Press Ctrl + V or right-click and select Paste to insert the screenshot.
-
Save or send your file as needed.
Handy if you want to copy and paste right away without cluttering your hard drive.
Method 3: Capture Only the Active Window
-
Click on the window you want to capture (make sure it’s active).
-
Press Alt + PrtScn.
-
The screenshot of that window is copied to your clipboard.
-
Paste it (Ctrl + V) into any app (Paint, Word, email).
This is great for focusing on just one window, so you don’t have to crop later.
Method 4: Capture a Custom Part of the Screen Using Snip & Sketch
-
Press Windows Key + Shift + S.
-
Your screen will dim, and a small toolbar appears at the top with options: rectangle snip, freeform snip, window snip, and full-screen snip.
-
Choose the snip type that fits your need (rectangle is the most common).
-
Click and drag to select the area you want to capture.
-
The selected part is copied to your clipboard and shows a notification.
-
Click the notification to edit or save using Snip & Sketch.
Perfect when you only want a piece of the screen, like a paragraph or image.
How Do I Save and Find the Screenshot After Taking It?
One of the biggest headaches for people is tracking down where their screenshots land. Here’s the scoop:
-
Windows Key + PrtScn saves screenshots automatically to C:Users[YourUsername]PicturesScreenshots.
Just open File Explorer and go there. -
PrtScn alone or Alt + PrtScn just copies images to your clipboard.
You need to paste them manually into an app like Paint and save from there. -
Snip & Sketch copies the screenshot to clipboard and pops up a notification. Click it to save or edit.
Pro Tip: If you want to quickly open the Screenshots folder, press Windows + E to open File Explorer, then click Pictures > Screenshots on the left sidebar.
Are There Built-in Keyboard Shortcuts for Screenshots on HP Laptops?
Yes! HP laptops running Windows 10 use standard Windows shortcuts, but sometimes folks get confused because of the PrtScn key’s location or labeling.
-
The PrtScn key might be combined with other functions (like Pause or Insert), so on some HP models, you might have to press Fn + PrtScn together to activate it.
-
So if PrtScn alone doesn’t work, try pressing Fn + PrtScn or Fn + Windows Key + PrtScn.
If you’re unsure, look at your keyboard for a tiny “Fn” key usually near the bottom left corner. Pressing Fn toggles the secondary functions of keys.
Can I Take a Screenshot of a Specific Window or Just the Entire Screen?
Absolutely, you can do both! This is probably one of the most useful things to know.
-
To capture the entire screen, just use PrtScn or Windows Key + PrtScn.
-
To capture only the active window, press Alt + PrtScn.
-
To capture a specific area, use Windows Key + Shift + S and drag to select.
For example, imagine you’re chatting with a friend but only want to share a funny message box, not your whole desktop. Using the rectangular snip (Windows + Shift + S) to select just that chat window saves time and looks cleaner.
Troubleshooting Common Issues with HP Laptop Screenshots
| Problem | Solution |
|---|---|
| PrtScn key doesn’t seem to work alone | Try pressing Fn + PrtScn. Some HPs require this combo. |
| Screenshots not saving automatically | Use Windows Key + PrtScn for auto-save; others need paste. |
| Clipboard empty after taking screenshot | Make sure you paste into an app like Paint to see it. |
| Cannot find saved screenshots | Check Pictures > Screenshots folder in File Explorer. |
| Want to edit screenshot immediately | Use Snip & Sketch (Windows + Shift + S) and click notification. |
Frequently Asked Questions (FAQs)
Q1: Can I change where Windows saves screenshots?
Not by default for the auto-save method (Windows + PrtScn). You can move the Screenshots folder manually, but it’s a bit advanced. Alternatively, use third-party apps that let you customize save paths.
Q2: Is there a way to take scrolling screenshots?
Windows 10 doesn’t support scrolling screenshots natively. You’ll need third-party tools like ShareX or Snagit for that.
Q3: How do I screenshot on an HP laptop without a PrtScn key?
Most HP laptops have a PrtScn key. If yours doesn’t, use Snip & Sketch (Windows + Shift + S) for capturing parts or full screen.
Q4: Can I take screenshots on the login screen?
No, Windows disables screenshot functions on the login screen for security reasons.
Final Thoughts: Screenshot Like a Boss on Your HP Laptop
Taking screenshots on an HP laptop with Windows 10 might sound tricky at first, but once you get the hang of it, it’s a breeze. Remember:
- Use Windows + PrtScn to save your whole screen automatically.
- Use Alt + PrtScn to capture just the active window.
- Use Windows + Shift + S to select exactly what you want.
And don’t forget, if you struggle with the PrtScn key, try holding Fn along with it. Your screenshots will then be saved or copied just like you want.
Next time you want to capture something cool, funny, or important, you won’t be fumbling around trying to figure out what keys to press—or where your screenshot vanished!
References
[1] According to Microsoft Support, Windows 10 provides built-in options like Snip & Sketch for flexible screenshot capturing: https://support.microsoft.com/en-us/windows/use-snipping-tool-to-capture-screenshots-8c23e759-e98a-2e02-f8a2-e4e1f0f449b5
[2] HP Support explains keyboard shortcuts for screenshots on HP devices: https://support.hp.com/us-en/document/c03683015
[3] Windows Central offers practical advice on screenshot shortcuts and troubleshooting: https://www.windowscentral.com/how-take-screenshot-windows-10
If you try these out, you’ll find taking screenshots on your HP laptop is just a couple of clicks away. Give it a shot—pun intended!