If you’ve ever wanted to save a moment on your screen—maybe a funny meme, an error message, or part of a spreadsheet—you’re in the right place. Taking a screenshot (or “print screen”) on your Dell laptop might sound straightforward, but honestly, it can get confusing if you’re not sure which keys to press or where your screenshot goes afterward. Don’t worry; I’ve been there, and I’ll walk you through everything you need to know, step by step.
Let’s dive in and clear up all the confusion around how to print screen on a Dell laptop.
What Key Combinations Do I Use to Print Screen on a Dell Laptop?
Before we get to where your screenshots land or how to capture just part of your screen, let’s start with the basics: what keys do you actually press?
1. The Classic Print Screen Key (PrtSc)
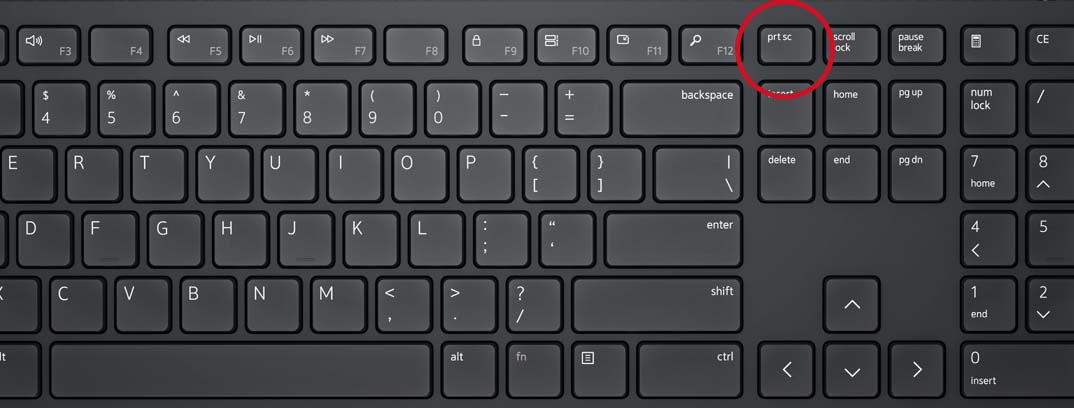
Most Dell laptops have a Print Screen (PrtSc) key on the top row of the keyboard, usually near the F12 key or Insert. Pressing this key alone will:
- Copy the entire screen image to your clipboard.
That means the screenshot isn’t saved as a file immediately. Instead, you’ll need to paste it somewhere—like in Microsoft Paint, Word, or an email.
How to use it:
- Press
PrtSc. - Open Paint (search for ‘Paint’ in the Start menu).
- Press
Ctrl + Vto paste your screenshot. - Save the image wherever you want.
2. Capture the Entire Screen and Save Automatically: Windows + PrtSc
If you’re on Windows 10 or 11 (which most Dell laptops run these days), there’s a shortcut that saves the entire screen directly as a file:
- Press
Windows key + PrtSctogether.
Your screen might dim for a second—that’s Windows telling you it worked.
The screenshot is automatically saved to the Screenshots folder inside your Pictures directory (more on that later).
3. Capture Only the Active Window: Alt + PrtSc
Sometimes, you don’t want the whole screen—maybe just the window you’re working in (say, a browser or a Word document). Here’s what you do:
- Click on the window to make sure it’s active.
- Press
Alt + PrtSc.
Like the plain PrtSc, this only copies the screenshot to the clipboard. You’ll need to paste and save it manually.
4. Capture Part of the Screen: Windows + Shift + S
Here’s a newer trick for Windows 10 / 11:
- Press
Windows key + Shift + S. - Your screen will darken, and your cursor will turn into a crosshair.
- Click and drag to select the part of the screen you want.
- The selected area is copied to your clipboard. Paste it into any app to save it.
This is perfect if you want just a small section without editing later.
How to Capture the Entire Screen Versus Just the Active Window?
We touched on this a bit, but since it’s a common question, let’s break it down clearly.
| What You Want to Capture | Key Combination | What Happens | Where Screenshot Goes |
|---|---|---|---|
| Entire screen (copy only) | PrtSc |
Copies full screen to clipboard | Clipboard (paste to save) |
| Entire screen (save file) | Windows key + PrtSc |
Saves full screen as PNG file | Pictures > Screenshots folder |
| Active window only | Alt + PrtSc |
Copies active window to clipboard | Clipboard (paste to save) |
| Part of the screen | Windows key + Shift + S |
Copies selected part of screen to clipboard | Clipboard (paste to save) |
So, the main difference is whether you want the whole screen or just the window you’re working in—and whether you want it saved automatically or copied.
Where Are Screenshots Saved on a Dell Laptop?
Now that you’ve captured your screenshot, where does it go? This is one of the biggest pain points for beginners.
When You Use Windows + PrtSc
If you use the Windows key + PrtSc combination, your screenshot doesn’t just sit in the clipboard. It automatically saves as a PNG file in this folder:
C:Users[Your Username]PicturesScreenshots
For example, if your username is John, the path would be:
C:UsersJohnPicturesScreenshots
Check your Pictures folder, and you’ll find a subfolder named Screenshots with your images.
When You Use PrtSc, Alt + PrtSc, or Windows + Shift + S
In these cases, the image is copied to the clipboard but not saved as a file. You need to paste it into an image editor like Paint or a Word document and save it manually:
- Open Paint: Press
Windows key, type “Paint”, and hit Enter. - Press
Ctrl + Vto paste your screenshot. - Go to File > Save As and save your image where you want.
Pro Tip:
If you end up pasting a screenshot into a Word document or email, remember that doesn’t save the image as a PNG or JPG file on your computer. You’ll want to save it manually if you need the actual picture file.
Are There Built-in Tools on Dell Laptops for Taking Screenshots?
Yes! Beyond these key combos, Windows includes several built-in tools that make screenshots easier and more flexible, especially if you want to annotate or edit images on the fly.
1. Snipping Tool (Windows 10 / 11)
This tool has been around a while and recently got updated. You can use it to:
- Capture rectangular areas.
- Capture free-form shapes.
- Take full-screen or window screenshots.
- Annotate, save, or share screenshots instantly.
How to use Snipping Tool:
- Press
Windows keyand type Snipping Tool, then open the application. - Click New to start a new screenshot.
- Select the area you want.
- The image opens in Snipping Tool, ready for marking up or saving.
It’s excellent if you want control beyond just taking a quick capture.
2. Snip & Sketch (Windows 10 / 11)
This is the modern version of Snipping Tool, slightly more powerful with options to delay captures, crop, highlight, and share.
You can launch it by:
- Pressing
Windows key + Shift + S(which we mentioned above). - Then, a small toolbar appears at the top of your screen with several capture modes.
After capturing, a notification pops up—click it to open the image in Snip & Sketch for edits.
3. Xbox Game Bar
This one’s unexpected but handy, especially if you want to capture screenshots during games or video playback.
- Press
Windows key + Gto open Xbox Game Bar. - Click the Capture widget.
- Press the camera icon to take a screenshot.
The screenshots are saved in:
C:Users[Your Username]VideosCaptures
This is a little niche, but worth knowing if you find yourself needing to screenshot gameplay.
Troubleshooting Common Screenshot Issues on Dell Laptops
“PrtSc” Key Doesn’t Work
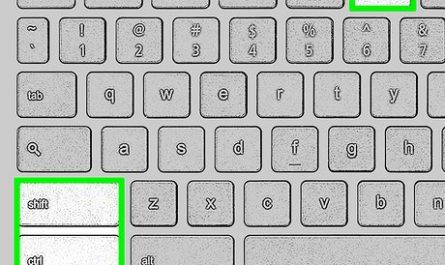
Sometimes, the PrtSc key is combined with other functions, especially on compact keyboards.
- Look for
Fn(Function) key. - Try pressing
Fn + PrtScorFn + Windows key + PrtScif the screenshot doesn’t work alone.
Can’t Find Screenshots After Saving
If you used Windows + PrtSc but can’t see your screenshots:
- Open File Explorer.
- Navigate to Pictures > Screenshots.
- Make sure your user account is selected (sometimes multiple user profiles confuse things).
Keyboard Layout Differences
Some Dell laptops might have slightly different key labels, especially international versions. Look for:
- Keys labeled PrtSc, Print Screen, PrtScn, or similar.
- Check your laptop manual or Dell’s support site for exact key locations.
Quick Summary Table: How to Print Screen on Dell Laptops
| Action | Key Combination | Screenshot Destination |
|---|---|---|
| Copy entire screen to clipboard | PrtSc |
Clipboard (paste to save) |
| Save entire screen as file | Windows key + PrtSc |
Pictures > Screenshots folder |
| Copy active window to clipboard | Alt + PrtSc |
Clipboard (paste to save) |
| Copy part of the screen | Windows key + Shift + S |
Clipboard (paste to save) |
| Use built-in editor | Open Snipping Tool or Snip & Sketch | Save or edit before saving |
FAQs About Taking Screenshots on Dell Laptops
Q: Can I change where screenshots are saved?
A: By default, screenshots saved with Windows + PrtSc go to the Screenshots folder inside Pictures. You can move them afterward, but Windows doesn’t let you change this folder location easily without some advanced tweaks.
Q: How do I screenshot a login screen or BIOS screen?
A: Unfortunately, Windows screenshot shortcuts don’t work on login or BIOS screens. You’d need to use an external camera or use special tools.
Q: Is there a way to take a screenshot with a delay?
A: Yes! Snip & Sketch and the Snipping Tool let you set a delay of a few seconds before the screenshot is taken, handy if you need to open menus or hover over items.
Q: Can I take screenshots without using keyboard shortcuts?
A: Absolutely. Use the Snipping Tool or Snip & Sketch apps to take screenshots with a few clicks.
Wrapping It Up
Taking a screenshot on a Dell laptop isn’t rocket science, but it does have a few quirks that trip people up, especially beginners. The big takeaway is: know your key combos, understand where your screenshots are saved, and use Windows’ built-in tools when you want more control.
Next time you want to grab a quick shot of your screen, try the handy Windows + Shift + S for partial screenshots or Windows + PrtSc to save the full screen automatically. And don’t forget the Snipping Tool if you want to annotate or delay captures.
You’ll be screenshotting like a pro in no time. Got questions? Just ask—I’ve got your back.
References
[1] According to Microsoft Support, keyboard shortcuts for screenshots include PrtSc, Windows key + PrtSc, and Alt + PrtSc. (https://support.microsoft.com/en-us/windows)
[2] Dell’s official documentation highlights location of screenshot files and keyboard layouts. (https://www.dell.com/support)
[3] Windows Central explains use of Snip & Sketch and other screenshot tools. (https://www.windowscentral.com/how-use-snip-sketch-windows-10)
If you want, I can help with a quick video walkthrough or more tips on screenshotting! Just let me know.