So, you want to connect your laptop to a bigger screen using HDMI but feel overwhelmed by all the ports, adapters, and settings? Don’t worry—you’re not alone. Many people get stuck trying to figure out which HDMI port their laptop has, whether they need an adapter, and how to make everything work once plugged in.
In this guide, I’ll walk you through everything you need to know about connecting HDMI to your laptop in a super straightforward way. We’ll cover:
- What HDMI ports actually look like on laptops
- How to physically connect your laptop to an external display
- When you do need adapters or special cables
- How to configure your display settings to get the perfect setup
By the end, you’ll feel confident plugging in your laptop to your TV, monitor, or projector without the usual headaches.
What Type of HDMI Port Does My Laptop Have?
Let’s start with the basics. HDMI ports aren’t all the same. Laptops can have different types of HDMI connectors, and it’s important to know what you’re dealing with before buying cables or adapters.
Types of HDMI Ports You Might See
-
Standard HDMI (Type A): This is the big one you probably recognize. It’s the full-size HDMI port that looks like a slightly flattened trapezoid. If your laptop is a bit bulkier or a few years old, it most likely has this.
-
Mini HDMI (Type C): Smaller than the standard one but not tiny. Sometimes found on ultra-thin laptops or tablets.
-
Micro HDMI (Type D): Even smaller, used mostly on some ultra-compact laptops or mobile devices.
Most laptops use standard (Type A) HDMI ports, but if you have something like a really thin ultrabook, 2-in-1, or convertible, check for mini or micro HDMI. If you see a really tiny port, it might be one of these.
How to Identify Your HDMI Port
Look closely at the side or back of your laptop. The HDMI port often has a small “HDMI” label nearby or looks like the images below:
| HDMI Port Type | Description | Common Laptop Use |
|---|---|---|
| Standard (Type A) | 14mm wide, trapezoid shape | Most laptops, desktops |
| Mini (Type C) | 10.5mm wide, smaller version | Some ultraportables, tablets |
| Micro (Type D) | 6mm wide, very small | Rare, mainly mobile devices |
If you’re not sure, check your laptop’s user manual or model specs online—manufacturers usually list the exact ports.
How Do I Connect an HDMI Cable to My Laptop and External Display?
Alright, once you know your HDMI port type, it’s time to physically connect your laptop to an external screen like a TV, monitor, or projector.
Step 1: Get the Right HDMI Cable
If your laptop has a standard HDMI port, a regular HDMI cable will do. One end plugs into the laptop, the other into the external display.
If your laptop has mini or micro HDMI, you’ll need a cable that goes from mini or micro HDMI on the laptop end to standard HDMI on the display. These are often called “mini HDMI to HDMI” or “micro HDMI to HDMI” cables.
Step 2: Plug It In
- Turn off both devices first (optional but safer).
- Plug one end of the HDMI cable into your laptop’s HDMI port.
- Plug the other end into the HDMI port on your TV, monitor, or projector.
Step 3: Power On and Switch Input
Turn on your laptop and external screen. For TVs or some monitors, you might need to switch the input source to the correct HDMI port using the remote or buttons on the display.
Step 4: Wait for the Connection
Your laptop should automatically detect the external display. If not, don’t panic—we’ll talk about figuring out display settings a bit later.
Do I Need Any Adapters or Special Cables to Connect HDMI?
This is where it gets tricky for many people. The answer: it depends on your laptop’s ports and the display’s inputs.
When You Don’t Need Anything Extra
- Your laptop has a standard HDMI port.
- Your display has a standard HDMI port.
- You have a regular HDMI-to-HDMI cable.
In this case, you’re good to go without adapters.
When You Might Need an Adapter or Converter
-
No HDMI on your laptop? Some laptops don’t have HDMI ports (especially ultra-thin ones). Instead, they have USB-C, DisplayPort, Mini DisplayPort, or VGA.
-
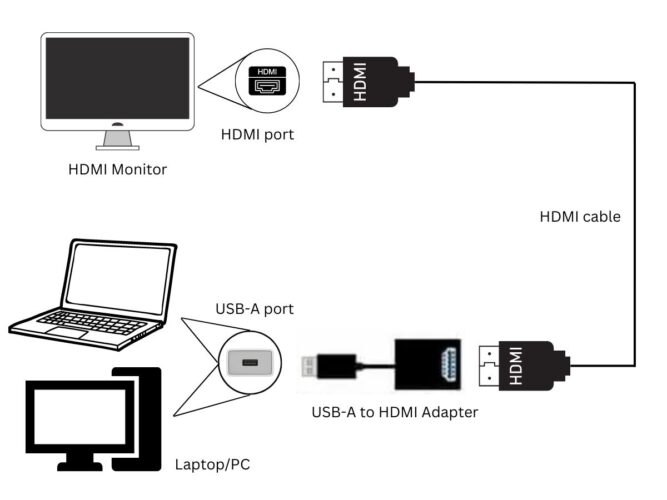
Your laptop has USB-C or Thunderbolt but no HDMI? You’ll need a USB-C to HDMI adapter or a cable that has USB-C on one end and HDMI on the other.
-
Your laptop has DisplayPort or Mini DisplayPort: You can get a DisplayPort to HDMI adapter.
-
Your display only has VGA or DVI inputs: Then you need a VGA-to-HDMI or DVI-to-HDMI converter, which might require external power.
What About Active vs Passive Adapters?
Sometimes you’ll see active adapters, which convert digital signals, and passive adapters, which just change the connector physically.
For example, USB-C to HDMI almost always requires an active adapter because the signals are different.
Pro Tip: Check Your Laptop Specs First!
Before buying adapters, look up your laptop’s ports. Most manufacturer websites or manuals list what ports you have and compatible accessories. This saves you from ordering the wrong cable or adapter.
How Do I Configure Display Settings After Connecting HDMI?
Once your HDMI cable is plugged in and both devices are powered on, your laptop often detects the external display automatically. But if it doesn’t, or if you want to customize how the displays work, here’s what to do.
Step 1: Open Display Settings
- Windows: Right-click on your desktop background and select Display settings.
- Mac: Go to System Preferences > Displays.
Step 2: Detect Displays (If Needed)
If your external display isn’t showing up, click Detect (Windows) or press the Option key to reveal the Detect Displays button (Mac).
Step 3: Choose Display Mode
There are typically three common modes:
- Duplicate (Mirroring): Shows the same content on your laptop and the external screen. Good for presentations.
- Extend: Makes the external display an extension of your desktop. You can drag windows between screens.
- Second Screen Only: Turns off your laptop display and uses only the external monitor.
Select whichever fits your needs by choosing the appropriate option.
Step 4: Arrange Displays (For Extend Mode)
If you select Extend, you can arrange the position of the displays virtually. Drag the screens in the settings window to match their physical layout — for example, placing the external monitor to the right or left of your laptop’s screen.
This step is crucial because it determines how your cursor moves between screens.
Step 5: Adjust Resolution and Scaling
Sometimes, the external display might look blurry or stretched.
- On Windows, under Display settings, select the external monitor and adjust Resolution and Scaling to recommended values.
- On Mac, under Displays preferences, choose Scaled and pick the right resolution.
Step 6: Save and Test
Once set, test by moving your cursor between screens or opening apps on the external display. If you want to switch back, just revisit these settings.
Troubleshooting Common HDMI Connection Issues
Connecting HDMI isn’t always plug-and-play. Here are quick fixes for common problems:
| Problem | Solution |
|---|---|
| No signal on external display | Check cable and port connections. Switch input source on TV. Restart devices. |
| Laptop doesn’t detect display | Use Detect Displays button. Try a different HDMI port or cable. Update graphics drivers. |
| Display resolution looks off | Adjust resolution and scaling in display settings. Make sure cable supports required resolution. |
| Adapter not working | Verify adapter compatibility. Try active adapter if using USB-C or DisplayPort. |
FAQ: Quick Answers to HDMI Laptop Questions
| Question | Answer |
|---|---|
| Can all laptops connect to HDMI? | Most do, but some ultra-thin laptops need adapters for HDMI. |
| Is HDMI better than VGA or DisplayPort? | HDMI supports video and audio digitally; VGA is analog and lower quality. DisplayPort supports higher resolutions but needs adapters for HDMI screens. |
| Why is my external screen flickering? | Could be a loose cable, wrong resolution, or outdated driver. |
| Can I use HDMI for audio as well? | Yes, HDMI carries both video and audio signals to compatible devices. |
Wrapping It Up
Connecting HDMI to your laptop doesn’t have to be a headache. Just start by identifying your HDMI port type, make sure you have the right cable or adapter, plug everything in carefully, and then tweak your display settings until it looks perfect.
Remember, if your laptop doesn’t have a standard HDMI port, don’t panic. With the right adapter—like USB-C to HDMI or DisplayPort to HDMI—you can still enjoy a big-screen experience.
So next time you want to binge-watch Netflix on a bigger screen or nail that presentation, you’ll be ready to plug and play like a pro.
References
[1] According to HDMI Licensing Administrator, Inc., HDMI Type A ports are the standard for most laptops and devices. (https://www.hdmi.org/spec/hdmi1_4b.aspx)
[2] Microsoft Support states you can configure multiple displays via Display Settings on Windows 10 and 11. (https://support.microsoft.com/en-us/windows/use-multiple-monitors-in-windows-10-1f72e8a9-77bc-4320-84c5-5f5b7e573a86)
[3] Apple Support explains how to connect external displays and adjust settings on Mac. (https://support.apple.com/en-us/HT202351)
If you need help with a specific laptop model or encounter any weird error messages, just ask! I’m here to help you sort through all the tech jargon.