So, you want to watch your favorite Netflix series or show off your latest vacation photos on the big screen? Connecting your laptop to your TV might seem tricky at first, but once you know what cables or settings you need, it’s pretty straightforward. Whether you’re wired or wireless, we’ll walk through all the options step-by-step.
Let’s get started.
What Cables or Adapters Do I Need to Connect My Laptop to My TV?
First things first: what exactly do you need to physically connect your laptop to your TV?
Common Cable Types and Ports
| Cable Type | Description | Common Use | Picture Quality | Audio Support |
|---|---|---|---|---|
| HDMI | High-Definition Multimedia Interface | The most popular cable for modern devices | Supports HD and 4K | Supports audio and video |
| VGA | Video Graphics Array (older standard) | Older laptops and TVs, video only, analog | Lower quality (SD/HD) | Video only |
| USB-C | Modern laptops use this versatile port | Can carry video, audio, and data with the right adapter | Supports HD/4K if DisplayPort compatible | Supports audio/video |
| DVI | Older digital video standard | Sometimes on older laptops/monitors | Good quality video | Video only |
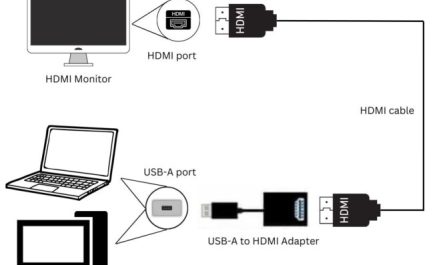
Most new laptops and TVs have HDMI ports because it’s the easiest way to get both video AND sound with a single cable. You just plug one end into your laptop’s HDMI port and the other into your TV.
But, older laptops might have VGA or DVI ports, which only carry video, so you’ll need a separate audio cable if you want sound. Also, VGA cables are analog, so the picture quality won’t be as sharp.
What if My Laptop or TV Doesn’t Have an HDMI Port?
If your laptop only has USB-C ports (like many modern ultrabooks or MacBooks), you’ll need a USB-C to HDMI adapter or cable. It’s a simple dongle that converts the signal to HDMI, letting you connect to your TV easily.
Similarly, some very old TVs or projectors might only have VGA or DVI ports. In that case, you might need an HDMI to VGA adapter — but beware, these converters can be a bit finicky, and often you have to power them externally.
Pro tip: Check your laptop’s ports before buying! Look on the sides for labels like HDMI, a symbol like a rectangle with two slanting sides for USB-C, or a trapezoid shape for VGA.
How Do I Change the Display Settings on My Laptop for TV Output?
Once you have the cable connected, you’re halfway there. Now you need to tell your laptop what to do with the TV screen.
Windows Laptops
- Connect your cable—plug your laptop into the TV.
- Turn on your TV and set it to the right input source (like HDMI 1 or 2).
- On your laptop, press Windows key + P. This opens the projection menu.
- You’ll see options:
- PC screen only (shows only on your laptop)
- Duplicate (shows the same thing on both screens)
- Extend (makes the TV a separate screen you can drag windows onto)
- Second screen only (turns off your laptop screen and shows only on TV)
- Choose what you want—most beginners start with Duplicate to mirror their screen.
You can also adjust resolution and orientation in Settings > System > Display to make sure everything looks sharp and fits on your TV screen.
MacBooks
- Connect your MacBook via HDMI or USB-C adapter to your TV.
- Turn on the TV and select the HDMI input.
- On your Mac, click the Apple menu > System Preferences > Displays.
- You should see an arrangement tab showing two displays.
- Check or uncheck Mirror Displays to either show the same thing on both screens or use the TV as a secondary screen.
- You can drag and arrange the blue boxes to match your physical setup.
If the TV looks stretched or blurry, adjust the resolution settings here too.
Can I Connect Wirelessly, and If So, How?
Sometimes, you just don’t want to mess with cables—understandable. Good news: most modern laptops and TVs support wireless connections.
Wireless Options
- Miracast: A wireless standard built into many Windows laptops and some smart TVs. It lets you mirror your screen without cables.
- Apple AirPlay: For MacBooks and Apple TVs or AirPlay-compatible smart TVs.
- Chromecast: A small dongle you plug into the TV’s HDMI port, controlled via your laptop and Wi-Fi.
- Smart TV Apps: Many smart TVs have built-in apps to connect with your laptop or phone over Wi-Fi.
How to Use Miracast (Windows)
- Make sure your TV supports Miracast or has a Miracast adapter.
- On your Windows laptop, press Windows key + K to open the Connect panel.
- Your TV should show up in the list. Click to connect.
- Your screen will mirror wirelessly.
How to Use AirPlay (MacBooks)
- Make sure your MacBook and Apple TV (or compatible TV) are on the same Wi-Fi network.
- Click the AirPlay icon in the menu bar.
- Select your TV from the list.
- Your Mac screen will mirror or extend wirelessly.
Using Chromecast
- Plug your Chromecast device into your TV’s HDMI port.
- Set Chromecast up on your Wi-Fi network.
- On your laptop, open Chrome browser.
- Click the three-dot menu > Cast.
- Choose your Chromecast device and select whether to cast a browser tab, your desktop, or a file.
Wireless Connection Downsides
Keep in mind wireless connections can have lag or lower video quality, so if you’re watching movies or gaming, a cable might be better. But for casual browsing or presentations, wireless is great.
Clearing Up Confusion: Which Cable or Port Should I Use?
It’s easy to get lost in the jumble of ports and cables. Here’s a simple guide based on your situation.
| Scenario | Recommended Cable/Adapter | Notes |
|---|---|---|
| New laptop with HDMI port + modern TV with HDMI | HDMI cable | Plug and play, supports video + audio |
| Laptop only has USB-C port + TV has HDMI | USB-C to HDMI adapter/cable | Make sure USB-C supports video output |
| Laptop has VGA port only + TV has HDMI | VGA cable + audio cable OR VGA to HDMI adapter | VGA is video only, so add audio separately |
| Wireless available (smart TV + laptop with Miracast or AirPlay) | Wi-Fi connection | Good for casual use, no cables |
Step-By-Step: Connecting a Laptop to a TV for Beginners
Let’s say you’re trying to connect your Windows laptop with HDMI to a Samsung smart TV. Here’s what you do:
- Identify ports on both devices. Find the HDMI port on your laptop and on your TV.
- Get an HDMI cable. They’re cheap and available online or in stores.
- Plug HDMI cable into laptop and TV.
- Turn on your TV, switch input to the HDMI port you plugged the cable into.
- Turn on your laptop.
- Press Windows key + P, select Duplicate.
- Your laptop screen should appear on TV within seconds.
- If the image looks stretched or the sound doesn’t come through, open Settings > System > Sound and select the TV as your default playback device.
FAQ About Connecting Laptops to TVs
Q: Why isn’t my TV showing anything when I connect the HDMI cable?
Make sure your TV input is set to the right HDMI port. Sometimes it doesn’t switch automatically. Also, check your laptop’s display settings (Windows key + P).
Q: I connected VGA but no sound. What do I do?
VGA carries video only. Use a separate 3.5mm audio cable from your laptop’s headphone jack to your TV or external speakers.
Q: Can I use a USB drive to connect my laptop to my TV?
No. USB drives store files but don’t transmit video output. You need specific video cables or wireless casting.
Q: My laptop has USB-C, but my TV doesn’t. How do I connect?
Get a USB-C to HDMI adapter. Make sure your laptop’s USB-C port supports video (DisplayPort Alternate Mode).
Final Tips to Make It Work Perfectly
- Always check your TV input source carefully before troubleshooting.
- Update your graphics drivers on your laptop; outdated drivers can cause detection issues.
- For wireless, make sure both devices are on the same Wi-Fi network.
- If video looks blurry, try adjusting resolution and scaling in display settings.
- When in doubt, Google your laptop and TV model + “HDMI port” or “video output” to find exact specs.
Connecting your laptop to your TV doesn’t have to be rocket science. Whether you’re watching movies, giving a presentation, or gaming, once you understand the cables and settings, it’s smooth sailing. Now you can enjoy your laptop content on the big screen without headaches or confusion.
Happy viewing!
References
[1] According to Lifewire, HDMI cables support both audio and video signals, making them the go-to connection type for most modern devices. https://www.lifewire.com/what-is-hdmi-1846826
[2] Microsoft Support explains how to use the Windows Projection feature with Windows key + P to easily manage multiple displays. https://support.microsoft.com/en-us/windows/project-to-another-display-in-windows-10-6b3c9976-6cf3-0a79-a94a-67c57cdc21af
[3] Apple Support details how to use AirPlay for screen mirroring from MacBooks to Apple TVs or compatible smart TVs. https://support.apple.com/en-us/HT204289
[4] Google’s Chromecast Help Center provides a step-by-step guide for casting your laptop screen wirelessly. https://support.google.com/chromecast/answer/3228332
If you have questions about your specific laptop or TV model, feel free to ask!