So, you’ve got a new printer or maybe you just want to make your old one work with your laptop. But, printers and laptops don’t always play nice right away, do they? Don’t worry — connecting your laptop to a printer isn’t rocket science. Whether you’re plugging in with a USB cable or going wireless, I’m going to walk you through it, step-by-step. Plus, I’ll help you tackle those annoying driver issues and troubleshooting headaches.
Ready? Let’s get started.
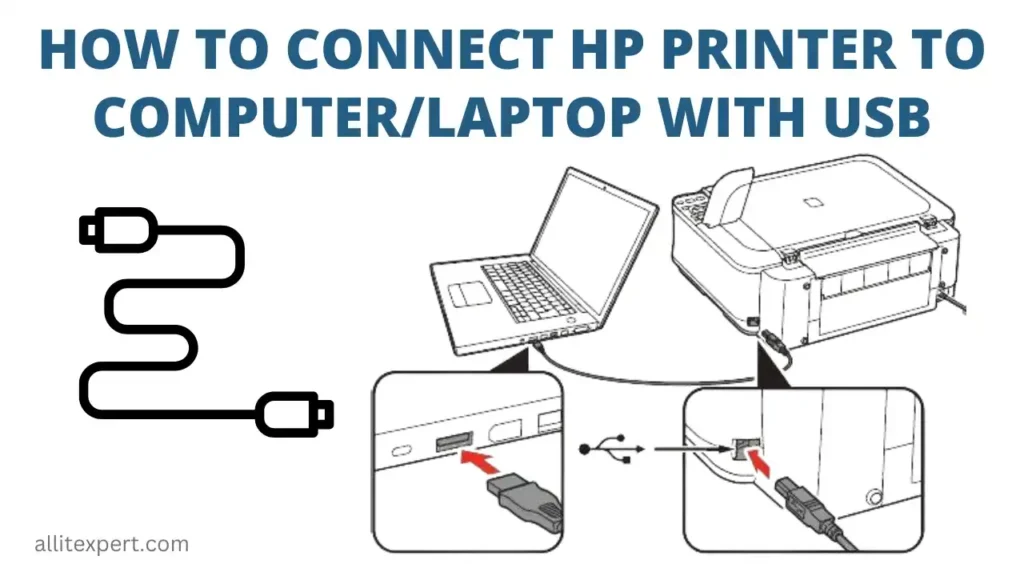
How Do I Connect My Laptop to a Printer via USB?
Connecting your laptop to a printer with a USB cable is usually the simplest way. It’s direct, fast, and doesn’t rely on Wi-Fi signals that cut out at the worst times.
Step 1: Locate the USB Port on Your Printer and Laptop
First things first, find the USB port on your printer. This is usually a square-shaped port labeled “USB” or with a printer icon. Your laptop will likely have a smaller USB port (Type-A or Type-C). If your laptop only has USB-C ports, you might need a USB-C to USB-A adapter.
Step 2: Plug in the USB Cable
Connect one end of the USB cable to your printer and the other to your laptop. Easy enough. If your printer is powered off, turn it on now.
Step 3: Wait for Your Laptop to Recognize the Printer
Most modern laptops automatically detect the printer once connected via USB. You might see a notification pop up saying “Installing device driver” or “Device ready to use.”
But what happens if nothing shows up? In that case, don’t panic — it’s usually a driver issue. The next section has you covered.
What Drivers or Software Do I Need to Install?
Drivers are tiny programs that let your laptop and printer talk to each other. Without the right drivers, your printer might not work, even if it’s physically connected.
How to Find and Install Printer Drivers
-
Check the Printer Manufacturer’s Website
Go to your printer brand’s official site (like HP, Canon, Epson, Brother). Look for the “Support” or “Downloads” section. -
Search for Your Printer Model
Enter your exact printer model number. This is usually on a sticker on the printer. -
Download the Latest Driver
Make sure you get the driver that matches your laptop’s operating system (Windows 10/11, macOS, etc.). Newer drivers often fix bugs and improve compatibility. -
Run the Installer
Follow the on-screen instructions in the installer. This usually means clicking “Next” a few times, agreeing to the terms, and waiting for it to finish. -
Restart Your Laptop
A reboot can help the driver install correctly and your system recognize the printer.
Automatic Driver Installation
Windows and macOS sometimes automatically find and install drivers for you. For example, Windows Update often downloads basic printer drivers. But these drivers might be limited and miss advanced features like scanning or duplex printing.
How Do I Connect My Laptop to a Wireless Printer?
Wireless printers are fantastic because they let you print from anywhere in your home without the hassle of cables. But wireless does come with its own set of confusing steps.
Step 1: Connect the Printer to Your Wi-Fi Network
Most wireless printers have a small screen or buttons allowing you to connect to a Wi-Fi network. Here’s how you usually do it:
-
Use the Printer’s Control Panel
Navigate the menu to “Network” or “Wireless Setup.” -
Select Your Wi-Fi Network
Choose your home Wi-Fi name (SSID) from the list. -
Enter the Wi-Fi Password
Use the keypad or touchscreen to type in your Wi-Fi password.
If your printer doesn’t have a screen, it might support WPS (Wi-Fi Protected Setup). Press the WPS button on your router and then on your printer to connect automatically.
Step 2: Connect Your Laptop to the Same Wi-Fi Network
Make sure your laptop is connected to the same Wi-Fi network as your printer. It’s a common mistake to have the laptop on one network and the printer on another.
Step 3: Add the Printer to Your Laptop
Depending on your OS:
- Windows 10/11:
- Open Settings > Devices > Printers & scanners
- Click Add a printer or scanner
- Wait for your wireless printer to appear in the list and select it
-
Follow any prompts to complete the setup
-
macOS:
- Open System Preferences > Printers & Scanners
- Click the + button
- Select your wireless printer from the list
- Click Add
Why Isn’t My Laptop Detecting the Printer?
Sometimes, even with the right steps, your laptop just won’t see the printer. Frustrating, right? Let’s troubleshoot.
Common Issues and Fixes
| Problem | Possible Cause | What to Do |
|---|---|---|
| Printer doesn’t show up | USB cable not fully plugged in | Unplug and plug back in; try a different USB port or cable |
| Printer driver missing or outdated | Drivers not installed or outdated | Download and install latest drivers from manufacturer’s site |
| Printer and laptop on different Wi-Fi networks | Wireless confusion | Connect both devices to the same Wi-Fi network |
| Firewall or antivirus blocking connection | Security software interference | Temporarily disable firewall/antivirus and test |
| Printer Offline or in Error State | Printer jam, no paper, or power off | Check printer status, clear jams, add paper, turn on printer |
| Outdated laptop OS | OS doesn’t support printer | Make sure your laptop OS is updated to latest version |
How to Check Printer Status on Windows
- Go to Control Panel > Devices and Printers
- Right-click your printer, select See what’s printing
- Check if the printer is Offline or Paused—right-click and choose Use Printer Online
On a Mac
- Open System Preferences > Printers & Scanners
- Select your printer and check the status below its name
Wireless vs Wired Printer Setup: What’s Best for You?
I get it — you might be stuck between choosing a USB connection or going wireless. Here’s a quick rundown:
| Connection Type | Pros | Cons | Best For |
|---|---|---|---|
| USB (Wired) | Simple, fast, stable | Limited to one device, cable mess | Home office, basic printing |
| Wireless | Convenience, print anywhere | Can be slow, connectivity issues | Multiple devices, flexible setup |
If you only want to print from one laptop that sits next to the printer, USB is straightforward. But if you have multiple devices or like printing from your phone, wireless is the way to go.
FAQs: Quick Answers to Common Printer Connection Questions
Q: Can I connect multiple laptops to one printer?
Yes! For USB printers, only one device can connect at a time. Wireless printers let multiple devices print over the network.
Q: My laptop says “driver not found” — how do I fix this?
Head to your printer brand’s website, download and install the correct drivers for your OS.
Q: Why does it take so long for my wireless printer to appear?
Wireless connections might take a while to establish. Make sure both devices are on the same network and close to the router.
Wrapping It Up
Connecting your laptop to a printer isn’t always smooth sailing, but it’s not a nightmare either. Whether you’re plugging in a USB cable or jumping into the wireless world, the key is having the right drivers and ensuring both devices are on the same network.
And hey, if something feels off, don’t hesitate to unplug everything, restart your devices, or even check YouTube for your exact printer model—it helps seeing the setup in action.
Got your printer printing yet? If not, come back here and try the troubleshooting steps. You’ll have that PDF or photo in your hands in no time.
References
[1] According to Microsoft Support, keeping your Windows OS updated improves device compatibility, including printers. https://support.microsoft.com/en-us/windows/update-windows-10-26f7d583-2e97-42a5-5fc6-b5a0e2ef2ccf
[2] Apple Support explains how to add printers on macOS through System Preferences. https://support.apple.com/en-us/HT201539
[3] HP’s official printer support site offers the latest drivers and troubleshooting steps. https://support.hp.com/us-en/drivers
[4] Epson’s guide on connecting wireless printers can help clarify network setup. https://epson.com/support/article/epson-wireless-printer-setup-guide
If you want me to help with a specific printer model or run through any of these steps again, just say the word!