Ever wanted to watch your favorite movies, browse photos, or even work on a big screen? Connecting your laptop to your TV makes all of that easier—and yes, it’s usually simpler than you think. But it can get confusing, right? With a bunch of cables, adapters, and wireless options floating around, figuring out what fits your setup can feel like decoding a secret message.
Don’t worry! I’ll walk you through everything—from the cables you need, how to tweak your display settings, to wireless tricks and troubleshooting tips. By the end, you’ll be streaming, mirroring, or extending your laptop’s screen on your TV like a pro.
What Cables or Adapters Do I Need to Connect My Laptop to My TV?
The first thing to figure out is what ports your laptop and TV have. Laptops and TVs come with various ports, and knowing which ones match up is key to getting started.
Common Ports You’ll See
| Port Type | Looks Like | Notes |
|---|---|---|
| HDMI | Wide, flat, almost trapezoid-shaped | Most common for video and audio |
| VGA | Larger with 15 pins in 3 rows | Older, video only, no sound |
| DisplayPort | Similar to HDMI but with one corner cut | Primarily on newer laptops |
| USB-C | Small, oval-shaped | Can carry video/audio with the right adapter |
| DVI | Big, rectangular with many pins | Older video-only connection |
| Composite or Component | Round RCA jacks (yellow, red, white) | Old-school, low quality video/audio |
Which Cable Do You Need?
1. HDMI Cable (Best and Most Common Option)
If your laptop and TV both have HDMI ports, this is the way to go. HDMI carries both video and audio in one cable, so you don’t need extra wires. Most laptops made in the last 5-10 years have at least one HDMI port, and nearly every modern TV definitely does.
Example: You want to connect your Dell XPS laptop to your Samsung smart TV? Chances are both have HDMI ports, so a simple HDMI cable will do.
2. USB-C to HDMI Adapter
Newer laptops (like MacBooks, many ultrabooks) might only have USB-C ports. For those, you’ll need a USB-C to HDMI adapter or cable. It’s not expensive and works like a charm.
3. VGA Cable (Older Laptops and TVs)
If you have an old laptop from 10+ years ago, you might see a VGA port. VGA only carries video, so you’ll need a separate audio cable (usually a 3.5mm jack) to get sound on your TV. Plus, picture quality isn’t as sharp as HDMI.
4. DisplayPort to HDMI Adapter
Some high-end laptops might come with DisplayPort instead. Use a DisplayPort-to-HDMI adapter to connect it with an HDMI cable to your TV.
Quick Tip: Before buying any cable or adapter, check both your laptop and TV’s ports carefully. Take a picture if needed. You don’t want to buy a USB-C to VGA cable when your TV only accepts HDMI.
How Do I Change the Display Settings on My Laptop to Use the TV as a Second Screen?
Once your cable is connected, your laptop may or may not automatically start detecting your TV. Sometimes it works right away, other times you need to tell your laptop to “see” the TV.
Step 1: Switch Your TV to the Correct Input
Use your TV remote and hit the Input or Source button to pick the HDMI port (or whatever input you’re using). Your TV won’t show anything if it’s on the wrong input.
Step 2: Detect the TV on Your Laptop
- On Windows 10/11:
- Press Windows key + P.
- You’ll see options: PC screen only, Duplicate, Extend, Second screen only.
- Choose Duplicate to mirror your laptop screen on the TV.
-
Or choose Extend if you want to use the TV as an extra display.
-
On macOS:
- Open System Preferences > Displays.
- Click the Arrangement tab.
- Check or uncheck Mirror Displays depending on your preference.
- Drag the blue rectangles to arrange which screen is left or right.
Step 3: Adjust Resolution and Scaling
Sometimes, the TV screen looks stretched or blurry. Go into your display settings and tweak the resolution to match your TV’s native resolution (usually 1920×1080 for Full HD, or 3840×2160 for 4K TVs).
On Windows, under Settings > System > Display, select the TV, then change Display resolution. On Mac, it’s under System Preferences > Displays too.
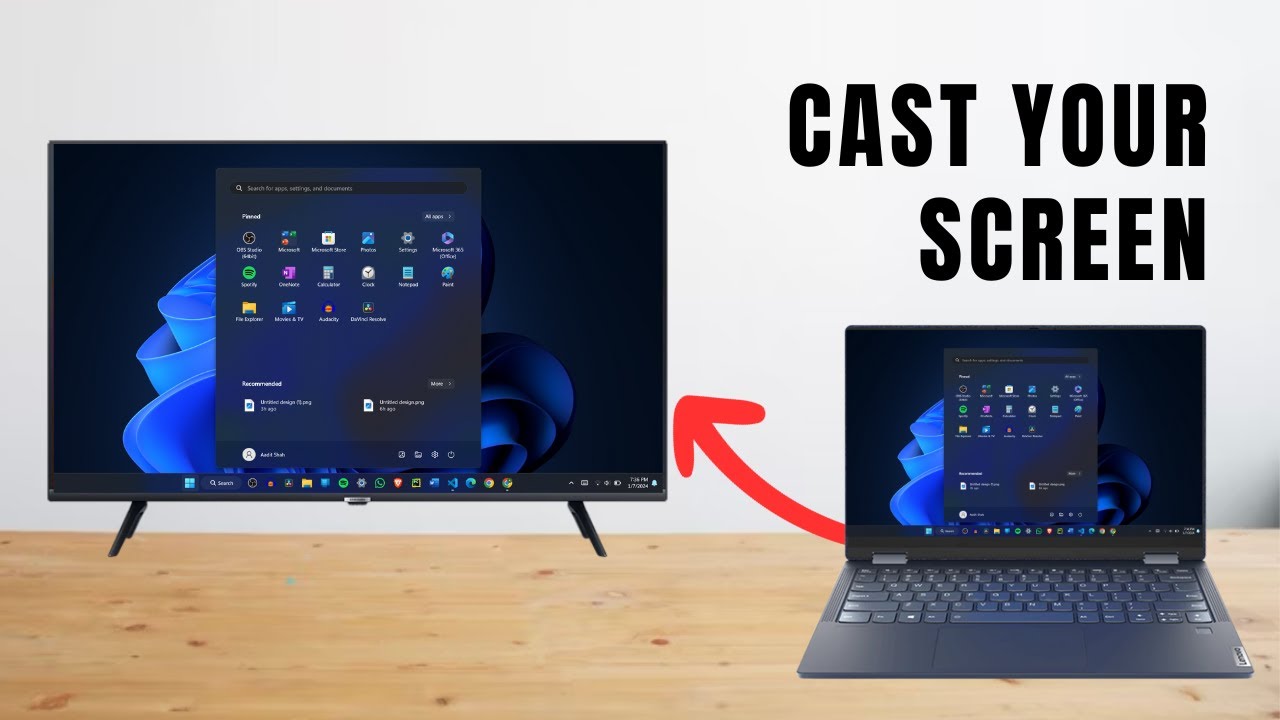
Can I Connect Wirelessly, and If So, How?
Wires are great, but they get messy. So, can you ditch the cables altogether? Yep!
Wireless Options
1. Miracast (Windows Only)
Many Windows laptops support Miracast, which lets you send your screen wirelessly to compatible smart TVs or streaming devices.
- Click the Notification Center icon (bottom right) on your laptop.
- Select Project or Connect.
- Choose Connect to a wireless display.
- Your TV should appear if it supports Miracast (check if your smart TV has “Screen Mirroring” or “Miracast” enabled).
- Select it, and your laptop will cast to the TV.
2. Apple AirPlay (Mac and Apple TV)
If you have a Mac and an Apple TV or AirPlay 2-compatible smart TV, you can wirelessly mirror or extend your display.
- On your Mac, click the AirPlay icon in the menu bar (top right).
- Choose your Apple TV or AirPlay-enabled TV.
- Select Mirror Display or use as a second display.
3. Google Chromecast
Chromecast works with pretty much any laptop through the Chrome browser.
- Plug Chromecast into your TV.
- Open Chrome on your laptop.
- Click the three dots menu and select Cast.
- Choose your Chromecast device.
- You can cast a browser tab, your entire desktop, or supported apps.
What About Reliability?
Wireless connections are convenient but can sometimes lag or lose quality due to interference or Wi-Fi strength. For casual streaming and presentations, wireless is usually fine. But for gaming or high-res video editing, a wired connection is more reliable.
What Are the Common Troubleshooting Steps if the TV Does Not Display the Laptop Screen?
Sometimes it’s not as smooth as plugging in a cable. So, what if nothing shows up on your TV?
Check the Basics First
- Is your TV set to the right input source?
- Are all cables connected firmly?
- Is your laptop’s volume up (for audio issues)?
Try These Fixes
1. Detect Displays Manually
In Windows, go to Settings > System > Display, and hit Detect. On Mac, in System Preferences > Displays, press Option and click Detect Displays.
2. Restart Devices
Turn off and unplug both your laptop and TV for 30 seconds, then power them back on. It can reset the connection.
3. Update Graphics Drivers
Sometimes outdated graphics drivers cause display issues. On Windows, run Windows Update or visit your laptop manufacturer’s site. On Mac, update your system software.
4. Check Cable Quality
Cheap or worn-out HDMI cables sometimes fail. Try another cable or adapter if possible.
5. Adjust Resolution
If the TV turns on but shows a blank or “out of range” message, lower your laptop’s display resolution to a safe setting (like 1280×720), then try again.
6. Disable Multiple Displays and Re-enable
Sometimes toggling between settings helps. Use Windows + P on Windows or uncheck/recheck Mirror Displays on Mac.
Quick FAQ
| Question | Answer |
|---|---|
| Can I use any HDMI cable? | Yes, but higher quality cables help for 4K video. |
| Will the sound play through the TV? | With HDMI and wireless, yes. With VGA or older cables, you need a separate audio cable. |
| Can I connect multiple TVs? | Yes, but you’ll need extra hardware or adapters, and settings get more complex. |
| What if my laptop has only USB-C ports? | Use a USB-C to HDMI adapter or cable. |
| Is wireless connection secure? | Generally yes, but keep your Wi-Fi network secure. |
Final Thoughts
Connecting your laptop to your TV is one of those simple pleasures that can make binge-watching, gaming, or presentations way better. Whether you go wired or wireless, keep in mind the ports and cable types, take a minute to set up display preferences, and don’t freak out if it doesn’t work immediately. Just follow the troubleshooting tips, and you’ll get it sorted.
And hey, if you’re buying cables or adapters, don’t just grab the first thing online—double-check port types and reviews so you don’t get stuck with the wrong fit. It’s easier than you think once you get the hang of it.
References
[1] According to Microsoft Support, Windows key + P is the fastest way to switch display modes (https://support.microsoft.com/en-us/windows/project-or-duplicate-your-screen-dfd67e7c-6c3e-8b0b-6f3e-7e7e9c3e2a12).
[2] Apple Support explains how to use AirPlay to mirror your Mac screen (https://support.apple.com/en-us/HT204289).
[3] Google Chromecast Help details casting from Chrome browser (https://support.google.com/chromecast/answer/3228332).