Ever needed to grab a quick screenshot on your ThinkPad laptop but felt lost in the maze of keyboard shortcuts or wondered where those screenshots actually go? You’re definitely not alone. ThinkPads are fantastic machines, but their quirky keyboard layouts and bundled software sometimes make simple things, like taking screenshots, a bit confusing for beginners.
No worries! In this article, we’ll walk through every straightforward way to take a screenshot on your ThinkPad — from keyboard shortcuts to built-in tools. Plus, I’ll share tips on finding your screenshots afterward (because what’s the point if you can’t find them, right?). By the end, you’ll feel like a screenshot pro, ready to capture anything from your screen with ease.
What Are the Different Methods to Take a Screenshot on a ThinkPad Laptop?
ThinkPads run Windows, so the good news is you have several options:
- Using Keyboard Shortcuts: The quickest way, but ThinkPads sometimes have their own twists.
- Built-in Tools: Windows comes with snipping/snapping utilities that let you capture specific areas.
- Third-party Apps: If you want more features, you can install dedicated software.
Let’s break these down, so you know which to use when.
How Do I Use Keyboard Shortcuts to Capture the Screen on a ThinkPad?
Method 1: The Classic Print Screen (PrtSc) Key
You’ve probably heard of the Print Screen (PrtSc) key. On a ThinkPad, it’s usually located in the top right corner of the keyboard. Pressing it copies a snapshot of your entire screen to the clipboard — but nothing gets saved as a file yet.
Here’s how to use it:
- Press the PrtSc key — this copies the full screen.
- Open an image editor or document (like Paint, Word).
- Paste the screenshot by pressing
Ctrl + V. - Save the file manually wherever you want.
Why might this confuse beginners? On many ThinkPads, the PrtSc key shares functions with other keys or requires the Fn key to work. You might need to press Fn + PrtSc instead of just PrtSc, especially on compact models.
Method 2: Windows Key + PrtSc for Auto Save
Want to skip the paste step? Use this:
- Press
Windows key + PrtScat the same time.
The screen may dim briefly, telling you a picture was taken. Windows automatically saves the screenshot as a PNG file in your Pictures folder, inside the Screenshots subfolder.
So, no more digging around your clipboard!
Method 3: Alt + PrtSc for Active Window
Only want to screenshot the current window, not the whole screen?
- Click the window you want to capture to make sure it’s active.
- Press Alt + PrtSc (or Fn + Alt + PrtSc on some ThinkPads).
This copies the active window to your clipboard, so you can paste it in an editor and save.
Method 4: Fn + Space (Specific to Some ThinkPads)
Some ThinkPad models have a dedicated screenshot hotkey combo: Fn + Spacebar. This key combo captures the screen or active window, depending on the model and settings.
If you’re unsure, check your ThinkPad’s user manual or Lenovo’s support site.
Where Are Screenshots Saved by Default on a ThinkPad Laptop?
If you use Windows key + PrtSc, the screenshots are saved automatically, so you can just forget about manual pasting.
Default save location:
C:Users[Your Username]PicturesScreenshots
On many ThinkPads, browsing to your Pictures folder is the easiest way to find them.
What about screenshots copied to clipboard?
If you use just the PrtSc or Alt + PrtSc keys, screenshots aren’t saved as files — they live on your clipboard. You need to open an image editor like Paint, paste (Ctrl + V), and then save.
If you’re scratching your head wondering where your screenshot went — this is why. It’s not lost; it’s just on the clipboard, waiting for you to save it.
How Can I Capture a Specific Window or a Portion of the Screen?
Sometimes you don’t want the whole screen — just a window or a specific area. Windows offers built-in tools to help here.
Using Snip & Sketch (Windows 10/11)
Windows has a handy app called Snip & Sketch (or Snipping Tool on older versions):
- Press
Windows key + Shift + Stogether. - Your screen will dim, and a small toolbar pops up at the top.
-
Choose from options:
-
Rectangular Snip: Drag to select a rectangular area.
- Freeform Snip: Draw any shape.
- Window Snip: Click a window to capture it.
-
Full-screen Snip: Capture everything.
-
The screenshot copies to your clipboard. A notification appears—click it to edit or save.
This tool is perfect if you want precise control. No more cropping later, saving time.
Using the Snipping Tool (Legacy)
If you prefer, search for Snipping Tool in the Start menu. It lets you snip and save screenshots similarly but is being replaced by Snip & Sketch in newer Windows versions.
Common Pain Points and How to Fix Them
Confusion Over Which Keyboard Shortcuts Work on Different ThinkPad Models
ThinkPads come in many flavors. Some have different keyboard layouts or need the Fn key to be toggled for function keys.
Tip: If PrtSc alone doesn’t work, try:
Fn + PrtScAlt + Fn + PrtScWindows key + Fn + PrtSc
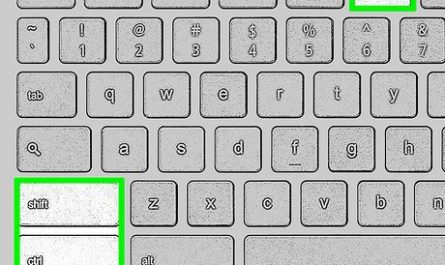
You can also check if your Fn Lock is enabled. On some ThinkPads, pressing Fn + Esc toggles this lock, switching function keys between media controls and F1-F12 keys.
Difficulty Locating Saved Screenshots
If you don’t know where your screenshots are, try this:
- Press
Windows key + Eto open Explorer. - Go to Pictures > Screenshots.
If you didn’t save the screenshot manually (like when only using PrtSc), it won’t be there. Remember, those are in your clipboard until pasted.
Pro tip: If you accidentally lost your copied screenshot, don’t press anything else—opening an app and pasting (Ctrl + V) is your best bet.
Unawareness of Built-in Screenshot Utilities or Third-party Alternatives
Some people don’t realize Windows already has powerful tools. Before downloading anything:
- Try Snip & Sketch with
Windows + Shift + S. - Use the Print Screen key combos.
If you want more features (like annotations, delayed screenshots, or video capture), apps like Greenshot, Lightshot, or ShareX are free and popular.
Quick Reference Table: ThinkPad Screenshot Shortcuts
| Shortcut | Action | Save Location |
|---|---|---|
PrtSc |
Capture full screen to clipboard | Clipboard (paste manually) |
Windows + PrtSc |
Capture full screen and auto-save | Pictures > Screenshots folder |
Alt + PrtSc |
Capture active window to clipboard | Clipboard (paste manually) |
Fn + Space (some models) |
Capture screen or window (varies) | Clipboard or auto-save (model-dependent) |
Windows + Shift + S |
Open Snip & Sketch to capture area/window | Clipboard; save manually via notification |
Wrapping It Up: Screenshot Like a Pro on Your ThinkPad
So, next time you want to snap something on your ThinkPad:
- Remember that Print Screen is your friend, but sometimes it needs Fn.
- Use Windows + PrtSc to save screenshots automatically.
- Try Windows + Shift + S to grab just part of the screen.
- Check your Pictures > Screenshots folder for saved images.
- If you’re stuck, don’t hesitate to paste into Paint or Word to save your image manually.
Screenshots might seem tricky at first, but with these tips, you’ll be capturing and sharing your screen effortlessly. Whether it’s grabbing a funny chat, saving an error message, or sharing your latest project, your ThinkPad has you covered.
FAQ
Q: My PrtSc key isn’t working on my ThinkPad. What should I do?
A: Try pressing Fn + PrtSc or toggle the Fn lock with Fn + Esc. If that fails, use Windows + Shift + S as an alternative.
Q: Where can I find screenshots taken with Windows + PrtSc?
A: Look in your Pictures folder under the Screenshots subfolder (C:Users[Your Name]PicturesScreenshots).
Q: Can I take a screenshot of just one window?
A: Yes! Use Alt + PrtSc to capture the active window to your clipboard or use Snip & Sketch (Windows + Shift + S) and select the window snip option.
Q: Are there better screenshot tools than the built-in ones?
A: For advanced needs, free apps like Greenshot or ShareX offer more features such as annotations and video capture.
Taking screenshots on a ThinkPad doesn’t have to be confusing anymore. Give these methods a try and see which one fits your style best!
References
[1] According to Lenovo Support, ThinkPad keyboards may require the Fn key for certain function keys to work properly. (https://support.lenovo.com)
[2] Microsoft Docs explains the Windows Snip & Sketch tool and its shortcuts. (https://docs.microsoft.com/en-us/windows)
[3] TechRadar covers the best free screenshot tools beyond Windows built-in utilities. (https://www.techradar.com)
If you want me to help you with screenshots on any other device or software, just ask!