If you’ve just got yourself a Dell laptop or you’ve been using one for a while but still can’t quite figure out how to take a screenshot, don’t worry — you’re not alone. Screenshots seem simple, but different models and Windows versions often make it confusing. Maybe you want to capture a funny chat, save an error message, or just grab part of your screen to save for later. Whatever your reason, this guide will walk you through how to take a screenshot on a Dell laptop step-by-step, clear up common confusions, and help you find where those screenshots actually get saved.
What Are the Keyboard Shortcuts to Take a Screenshot on a Dell Laptop?
First off, let’s talk keyboard shortcuts. These are the quickest way to snap a screenshot on your Dell laptop, and luckily, most of them are pretty straightforward.
Common Screenshot Shortcuts on Dell Laptops
| Shortcut Keys | What It Does |
|---|---|
| PrtScn (Print Screen) | Captures the entire screen and copies it to clipboard |
| Windows + PrtScn | Captures the entire screen and saves it as a file |
| Alt + PrtScn | Captures the active window and copies to clipboard |
| Windows + Shift + S | Opens snipping tool for selecting part of the screen |
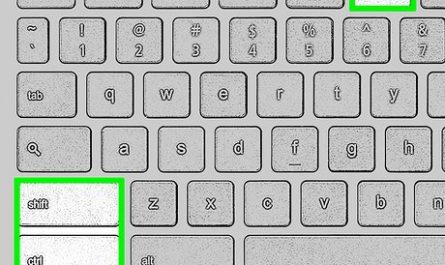
So, what’s the deal with these keys? The PrtScn key (usually found near the top-right corner of your keyboard) is the classic screenshot key that copies your whole screen to the clipboard. But here’s the kicker: it doesn’t save a file automatically. You’ll need to open an image editor, like Paint, and paste it there (hit Ctrl + V) to save it.
If you want a screenshot saved immediately as a file, your best bet is Windows + PrtScn. This instantly saves the whole screen as a PNG file inside a folder called “Screenshots.”
Which Shortcut Works Best for You?
If you’re on a newer Dell laptop running Windows 10 or 11, Windows + Shift + S is a fantastic option. It opens the snipping tool, letting you drag your cursor to capture exactly what you want — no more guessing.
Older Dell laptops might have a slightly different keyboard layout or require you to press the Fn (Function) key along with PrtScn, like Fn + PrtScn or Fn + Windows + PrtScn. So, if your laptop’s not responding, try adding the Fn key into the mix.
How Do I Capture the Entire Screen Versus Just a Part of It?
Let’s be real: sometimes you want the whole screen, and other times, just a sliver of it. Knowing the difference will save you tons of time and frustration.
Capturing the Entire Screen
When you want to grab everything you see on your screen, press either:
- PrtScn – copies the whole screen to your clipboard
- Windows + PrtScn – saves the screenshot directly to your “Screenshots” folder
After hitting PrtScn, just open Paint, Word, or any image editor, and paste (Ctrl + V). From there, save it manually.
The Windows + PrtScn method is slicker because it does all that automatically for you. Your screen will even dim briefly to let you know the screenshot was taken.
Capturing Just Part of the Screen
For grabbing a specific section, Windows + Shift + S is your best friend. This shortcut opens a small toolbar at the top of your screen where you can pick:
- Rectangular snip: Drag your cursor to select a rectangle
- Freeform snip: Draw freehand around what you want
- Window snip: Select a specific window
- Fullscreen snip: Like PrtScn, but through the snip tool
After making your selection, the screenshot is copied to your clipboard, and a notification pops up. Click that notification to open and save or edit your snip.
Using the Snipping Tool or Snip & Sketch App
Older Windows versions had the Snipping Tool; newer ones have Snip & Sketch. Both do the same thing: let you grab parts of your screen with ease.
Just search for “Snipping Tool” or “Snip & Sketch” in your Start menu. Open it, select the type of screenshot, and save. It’s perfect if you don’t want to rely on keyboard shortcuts or want editing tools built-in.
Where Are Screenshots Saved on a Dell Laptop?
Okay, so you took the screenshot — now where did it go? This is where a lot of people get stuck.
Screenshots Taken With Windows + PrtScn
These screenshots are automatically saved as image files in your Pictures folder. Here’s the full path:
C:Users[Your Username]PicturesScreenshots
Each file is named something like Screenshot (1).png, Screenshot (2).png, etc.
Screenshots Taken With Just PrtScn or Alt + PrtScn
These don’t get saved as files. Instead, the image is copied to your clipboard. You have to open an app like Microsoft Paint or Word and press Ctrl + V to paste it, then save the file manually.
Screenshots Taken With Snip & Sketch or Snipping Tool
When you use these tools, the screenshot is copied to the clipboard and you get a pop-up notification. Clicking the notification opens the image for you to save anywhere you want.
Trouble Finding Screenshots?
If you can’t find your screenshots, try this:
- Open File Explorer
- Go to the Pictures folder
- Look for the Screenshots folder
If it’s not there, you might have saved the image somewhere else manually.
Are There Built-in Tools or Apps on Dell Laptops for Screenshots?
Yes! Dell laptops running Windows come preloaded with a few options:
Snipping Tool / Snip & Sketch
As I mentioned earlier, Windows includes these handy apps.
- Snipping Tool is the classic version, found in Windows 7 and 10.
- Snip & Sketch is the improved version in Windows 10 (from 2018 update) and Windows 11.
Both are great for precise screenshots with editing options like highlighting or cropping.
Xbox Game Bar
Did you know Windows also has a built-in Xbox Game Bar? It’s mainly for gamers, but it has a screenshot feature too.
Press:
- Windows + G to open the Game Bar
- Click the camera icon or press Windows + Alt + PrtScn to snap a screenshot
Game Bar saves images in:
C:Users[Your Username]VideosCaptures
This is less commonly used but handy if you’re already using Game Bar for other features.
Common Pain Points and How to Fix Them
If you’re still scratching your head about screenshots, here are some quick tips for common problems.
1. Confused About Which Keys Work on Your Dell Model?
Dell has many laptop models with slight keyboard variations. If PrtScn alone doesn’t work, try adding the Fn key. For example:
- Fn + PrtScn
- Fn + Windows + PrtScn
These combinations help because some laptops assign the Print Screen function as a secondary key.
2. Can’t Find Your Screenshots?
Remember, only Windows + PrtScn saves files automatically. If you use just PrtScn, open Paint or Word and paste manually.
If you used the snipping tool, look for the notification that allows you to save your image.
3. Want to Capture a Specific Part but Don’t Know How?
Use Windows + Shift + S. It’s quick and lets you select exactly what you want. Don’t forget to check your notifications after capturing — that’s how you save or edit your snippet.
Quick Summary Table: Screenshot Methods on Dell Laptops
| Method | Key Combination | What It Does | Where It’s Saved |
|---|---|---|---|
| Full screen (copy) | PrtScn | Copies screen to clipboard | Clipboard (paste manually) |
| Full screen (save file) | Windows + PrtScn | Saves screenshot as PNG file | Pictures > Screenshots folder |
| Active window (copy) | Alt + PrtScn | Copies active window to clipboard | Clipboard (paste manually) |
| Partial screen (select) | Windows + Shift + S | Opens snip toolbar for selection | Clipboard + notification for saving |
| Snip & Sketch Tool | Search “Snip & Sketch” | Grab and edit screenshots | Save wherever you like |
| Xbox Game Bar screenshot | Windows + Alt + PrtScn | Saves screenshot during gaming | Videos > Captures folder |
Final Thoughts: Screenshot Like a Pro on Your Dell Laptop
Taking screenshots on your Dell laptop doesn’t have to feel like rocket science. Once you know which shortcut to press, where your images save, and which tool to use for partial screenshots, you’ll be flying through your tasks without a hitch.
So, next time you want to grab a funny meme, save an online receipt, or capture a tricky error message, just remember: Windows + PrtScn is your quick save, Windows + Shift + S lets you get picky, and apps like Snip & Sketch add a little polish. Try them out, and you’ll wonder why you ever stressed about screenshots in the first place.
References
[1] According to Microsoft Support, the Windows + PrtScn shortcut saves your screen capture to the Pictures > Screenshots folder automatically.
(https://support.microsoft.com/en-us/windows/take-a-screenshot-using-the-snipping-tool-9e9ebebc-5a71-4b1e-9884-6f271dbf52a0)
[2] As per Dell’s official keyboard guide, some laptop models require using the Fn key with Print Screen to activate screenshot functionality.
(https://www.dell.com/support/kbdoc/en-us/000132200/dell-laptop-keyboard-layout-and-function-keys-overview)
[3] Windows Central explains the usefulness of Windows + Shift + S for snipping and partial screenshots on Windows 10 and 11.
(https://www.windowscentral.com/how-use-snipping-tool-windows-10)
Feel free to ask if you want me to cover how to take screenshots on Mac or Chromebook too!